Getting Started With Houdini Engine
Houdini Engine is a product available from SideFX which allows users to load Houdini Digital Assets into other 3D applications besides Houdini. We have implemented a module which integrates Houdini Engine into Omegalib, allowing users to import content from Houdini and display them within a visualisation.
In this section we will explain how to compile and use the Houdini Engine Omegalib module within the DAVM.
Compiling The Module
In order to compile and use the Houdini Engine Omegalib module it is necessary to have access to a licensed installation of Houdini. The Houdini install contains source code include files and runtime libraries which the Omegalib module needs access to in order to compile and run successfully. You will need to have a copy of Houdini installed on your workstation or laptop in order to proceed with this guide.
Note: This guide assumes that you are running the Linux version of Houdini on your workstation or laptop. It is not currently possible to compile the DAVM Houdini Engine Omegalib module against a Windows or macOS version of Houdini.
Creating A Shared Folder
We need to set up a shared folder in order to provide the DAVM with access to the Houdini installation on the host machine. In order to do this, the DAVM should be up and running and logged in as the davm user account.
First of all, open a Konsole terminal shell window and enter the su command to become the root user (password should be the same as that which was used to log in as davm).
Next, create a directory to act as the mount point for the shared folder using the command shown below:
mkdir -p /opt/hfs<version_number>
Replace <version_number> with the version number of your Houdini installation (e.g 15.5.480).
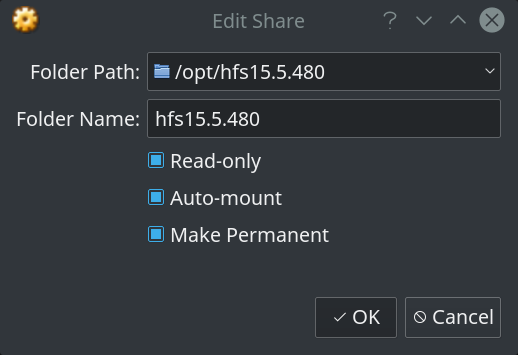
Once this is done, we need to provide some configuration information to VirtualBox to allow it to set up the shared folder. Open the Shared Folder Settings… menu entry under the Devices menu and create a new shared folder entry with the settings shown below (adjust the version numbers shown to match up with the version number of your Houdini installation):


Now return to the terminal shell within the DAVM that you created earlier and execute the command shown below to mount the shared folder within the virtual machine (replace <version_number> as before):
mount -t vboxsf hfs<version_number> /opt/hfs<version_number>
To confirm that the shared folder has been mounted correctly, execute the ls command shown below:
ls /opt/hfs*
You should see a directory listing corresponding to the contents of the Houdini installation shared from your host machine.
Compiling daHEngine.so
For this part of the guide, you will need the same terminal shell (with root login) created during setup of the shared folder as described above. Within this shell, export an environment variable referencing the shared Houdini folder as shown below:
export HFS=/opt/hfs<version_number>
Now we can compile the Houdini Engine Omegalib module using the following series of commands:
cd /local/omegalib/build
rm CMakeCache.txt
cmake ../ -DMODULES="cyclops daHoudiniEngine daMatlab daHandles omegaOsgEarth porthole pointCloud webView"
make daHEngine
The compile process will take a few minutes to complete successfully. When done, we need to copy the library containing the module into the Omegalib install directory. This may be achieved with the following command:
cp /local/omegalib/build/bin/daHEngine.so /local/omegalib/install/omegalib/bin/
That’s it – you’re now ready to go. Close the terminal shell (or type exit to leave the root login session) and read on to find out how to perform a simple test to confirm that the module is now working correctly.
Using The Module
In order to try out the Houdini Engine Omegalib module, we need to have an instance of Houdini Engine up and running to connect to. Open a terminal on your workstation or laptop (i.e., not within the DAVM) and start the Houdini Engine with the following command:
HARS -s 7788
Note: In order to execute the command above your shell environment will need to be configured correctly for Houdini. To configure your shell environment, source the
houdini_setupscript provided with your Houdini installation.
The service will start up and continue executing in the shell until you are ready to exit (press CTRL-C on your keyboard while the shell window is active in order to do so). Leave the service running for now however, as we’ll need to connect to it in a moment from the DAVM.
Restart the DAVM if it is not already running, and make sure that the shared folder we created earlier is mounted. Next, we need to find the IP address that VirtualBox has assigned to your host machine from the perspective of the DAVM. Open a fresh terminal shell within the DAVM and type the following command:
netstat -rn
Look for the IP address listed under the Gateway heading of the command output (on my machine, the IP address is 10.0.2.2) and export this into the shell environment as shown below:
export DA_HOUDINI_ENGINE_HOST=10.0.2.2
Note: An equivalent environment variable,
DA_HOUDINI_ENGINE_PORTexists for the Houdini Engine port number. Set this environment variable to the value of the port number you provided to theHARScommand above, but only if you used a different value to the default port number of7788.
Type orun to launch Omegalib. An blank graphics display window will open up, however ignore this for now – click to select the shell window where you typed the orun command and press the Enter key to bring up the orun prompt. Now type the following Python commands:
import daHEngine
e = daHEngine.HoudiniEngine.createAndInitialize()
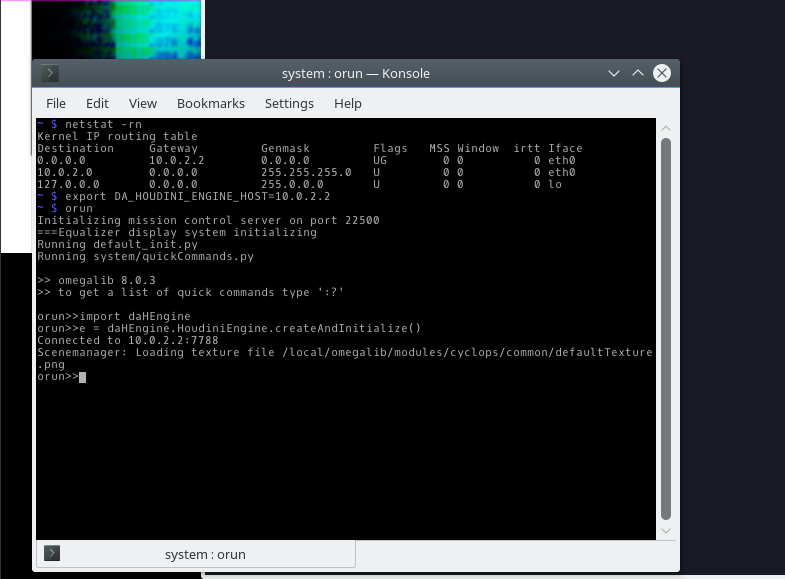
The Houdini Engine Omegalib module within the DAVM will initialize and create a connection to the Houdini Engine service running on the host machine. If everything worked correctly you should see a Connected message similar to that shown below:


Finally, select the blank graphics window and press the ESC key to exit Omegalib.
Congratulations! – you now know how to launch the Houdini Engine Omegalib module within the DAVM and connect to a Houdini Engine service instance running on your machine. You are now ready to move on to the next section in this series.