Reaper Surround Multitrack Mixing

The Data Arena utilises 16 audio channels (14 in the round, plus 2 LFE subs placed opposite each other across the arena)
Reaper can utilise an 'FX' plugin called "ReaSurround" to help animate and 'move' an audio track in '3D' around the DA speaker space.
Shown below is an example Reaper project:
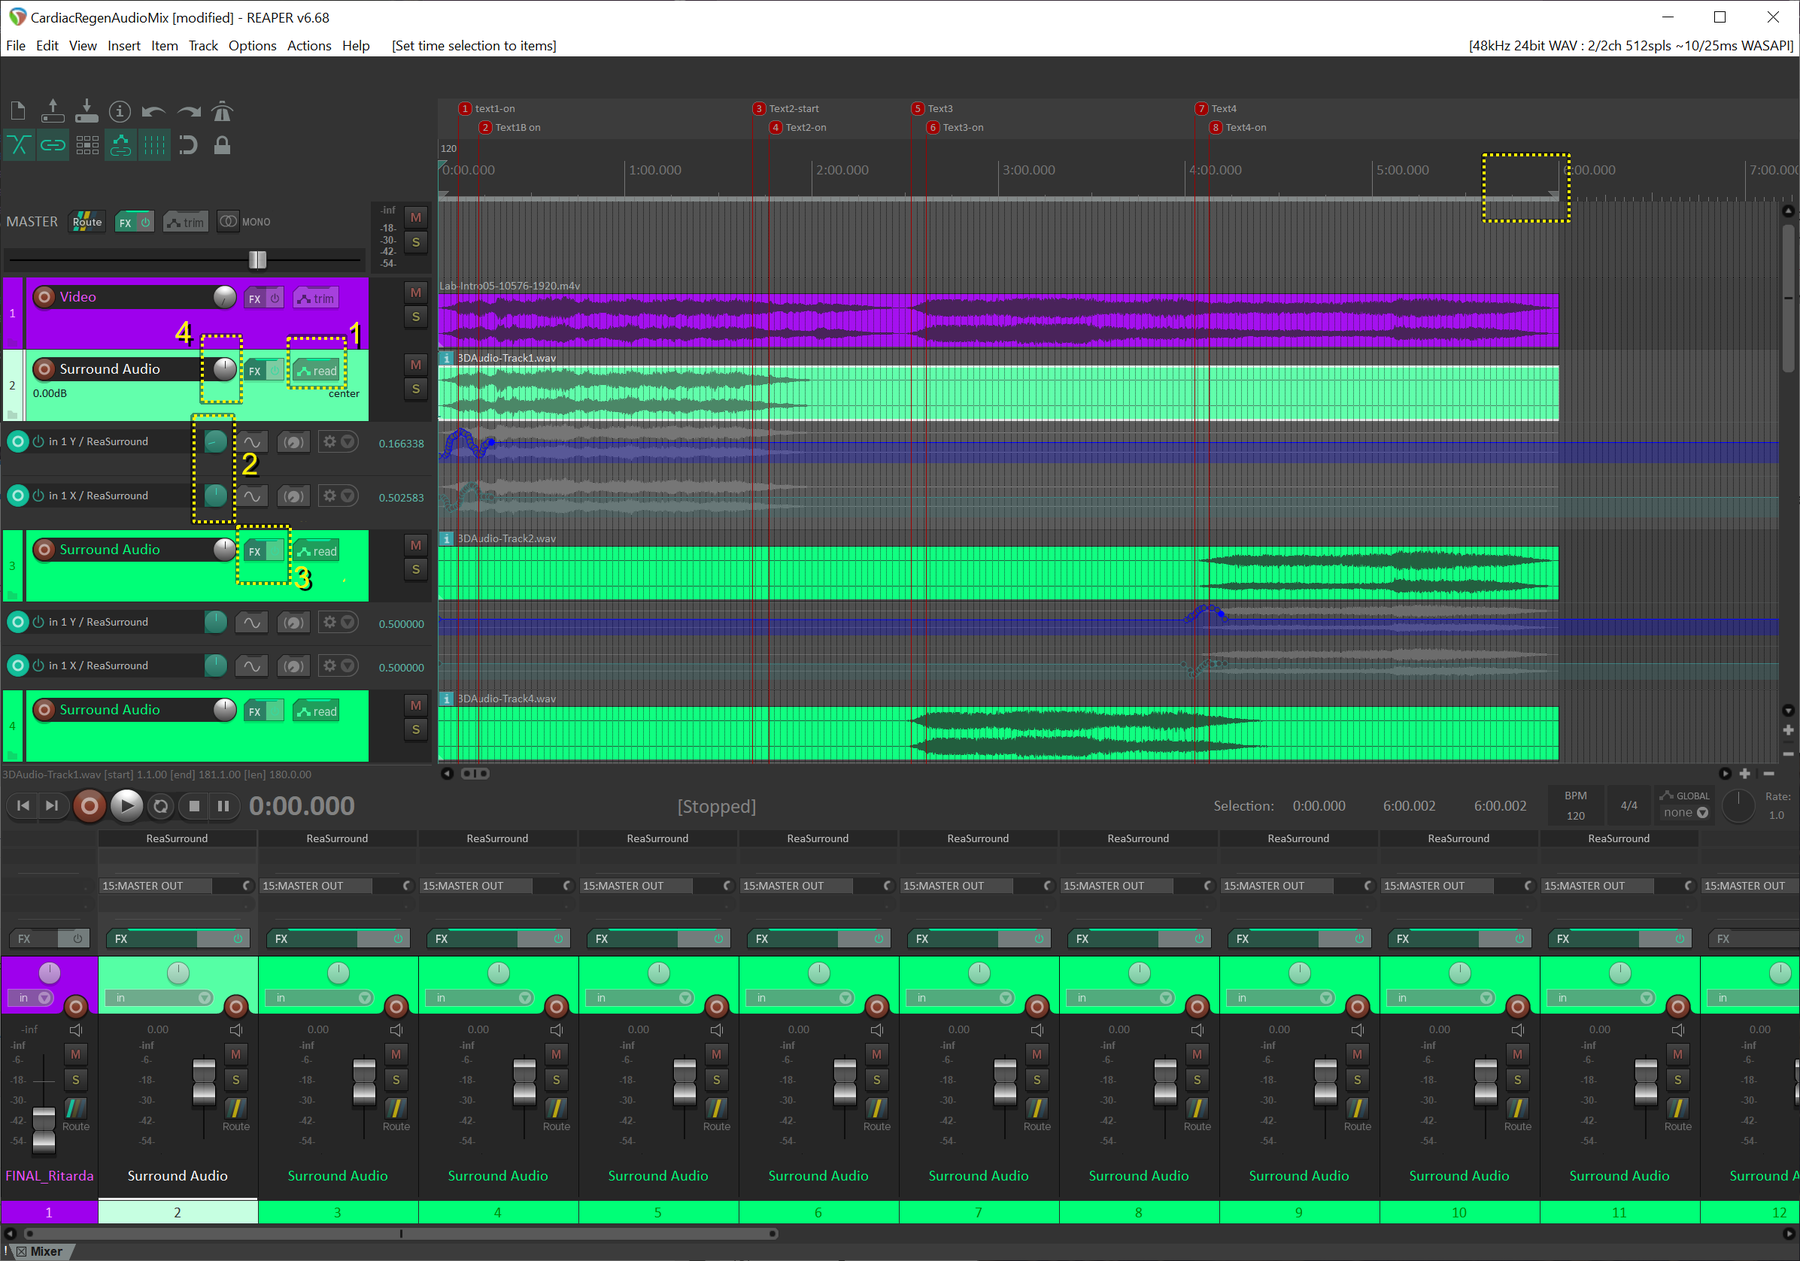

Track 1 "Video" : contains a video file, which in turns contains a stereo audio track
NOTE: In this instance, Track 1 is configured so that the audio track present in the video file does not get included in the mix / playback
To view the video playback: View (menu)> Video ( Shortcut: Ctrl+Shift+V )
Tracks 2, 3, 4 "Surround Audio" : each contain a stereo audio track, and each with the "ReaSurround" FX plugin enabled
The entire audio sequence is currently selected (shown by the grey line stretching across the full length of the timeline). This is useful when rendering the final audio track
To select the entire timeline, Right-click in the top timeline area > "Set selection to items"
The playback head is set to the beginning of the timeline. To set the playback position, either single-left-click at the desired location in the top timeline, or double-click the displayed time to the right of the transport bar, which will then show a dialog box allowing you to enter the exact time you wish to jump to
The fader level for each of the tracks has been set to 0.0dB. To quickly reset a track's fader level to zero, double click on the track's volume knob ("4" in the image below)
Adding the ReaSurround FX plugin
Click the "FX" button ("3" in the main image above) on the track you wish to spatially control
( If no FX plugin has yet been added to the track, a dialog box will appear where you can select "VST: ReaSurround (Cockos)" from the list )
The following plugin list window will then appear; clicking on the name in the left list shows the plugin's main interface window as shown here:
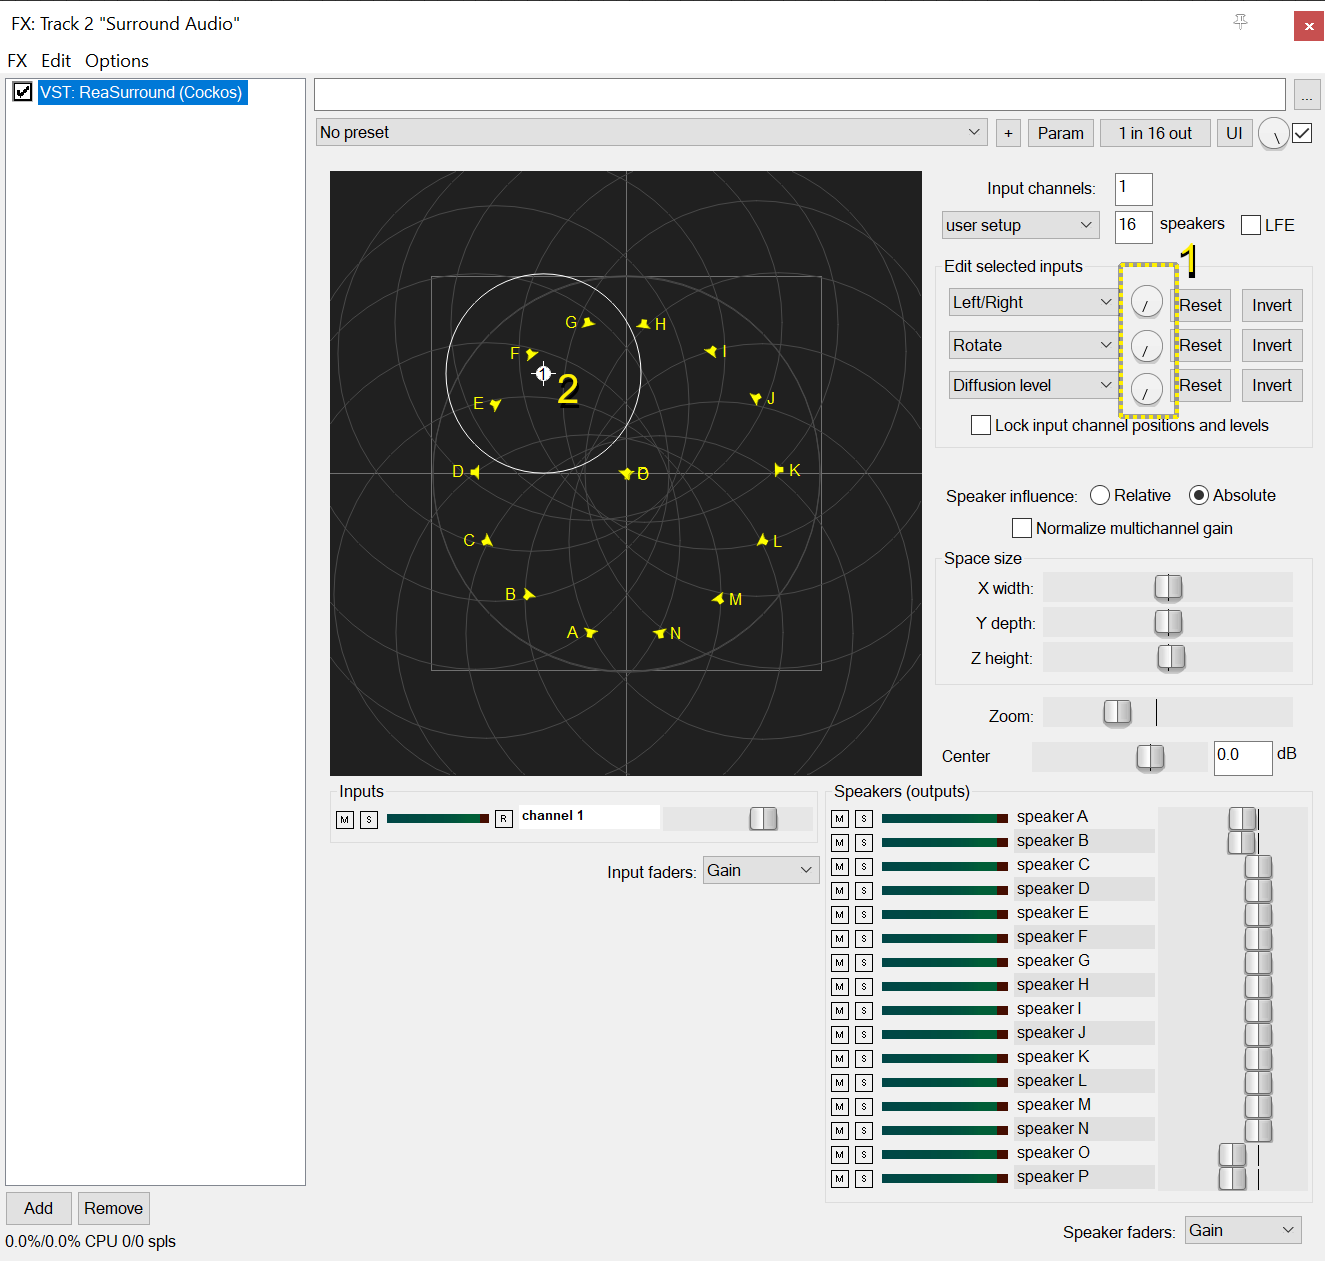

In this instance, the ReaSurround plugin has been configured to a single input-channel (Input channels: 1), to 16 speakers
The speakers start at 'A' (to the left of the DA doorway looking in), around the circumference of the arena to 'G' and 'H' representing front of house, and the back around to the right of the doorway at 'N'
The two final speakers 'O' and 'P' (shown in the centre of the speaker space) are the two LFE channels (which have also both had their gain reduced slightly as shown by the speaker faders
- These three controls can be clicked on and 'animated' in real-time, using the mouse for example, to move the audio track spatially with relation to the speakers.
- In the example from the close-up image shown later, we are looking at the plugin for Track 2, and the play-head at 6.114 secs. At that moment in time, the audio (shown here as the white dot), is spatially positioned front-left of house
(You can also animate the audio channel by directly clicking-on and moving the audio 'dot' around the speaker-mapped space)
Showing the animated tracks
Click the "trim"* button ("1" in the first main image) on the audio track you wish to show the animated 'envelopes' for
NOTE: The "trim" button changes its name depending upon its current state - once configured to animate a track, the button can have names such as "read", or "wrt" (write)
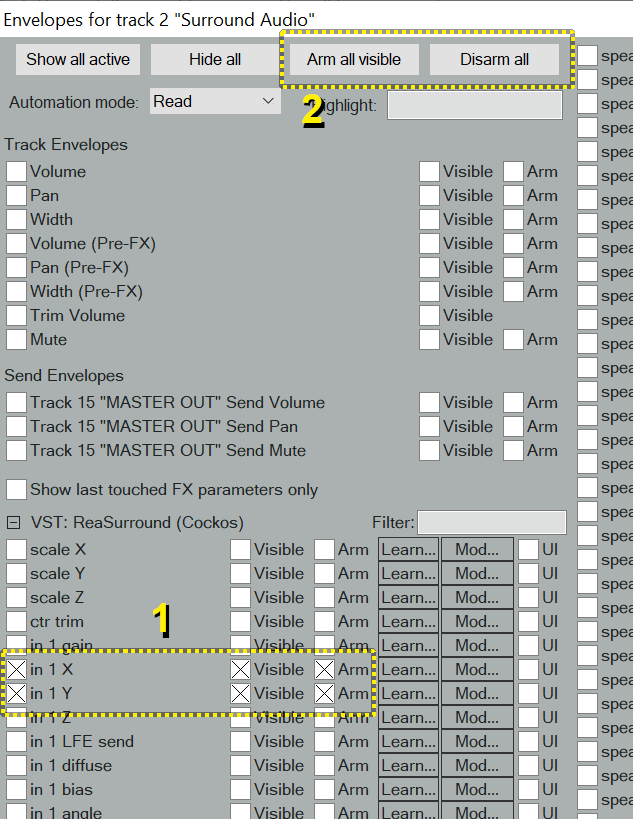
The following 'Envelopes' window will appear:

-
Enable the channels you wish to animate - in this instance to move the audio channel around the speaker space in just 2D, we just need to enable the "in 1 X", and "in 1 Y" options in the 'VST: ReaSurround' section
[ When this is done, it will also enable the 'Visible' and 'Arm' options ]
-
You can use the "Arm all visible" and "Disarm all" buttons to toggle the 'Armed' status of the animated envelopes (discussed later)
Animating the track's surround position
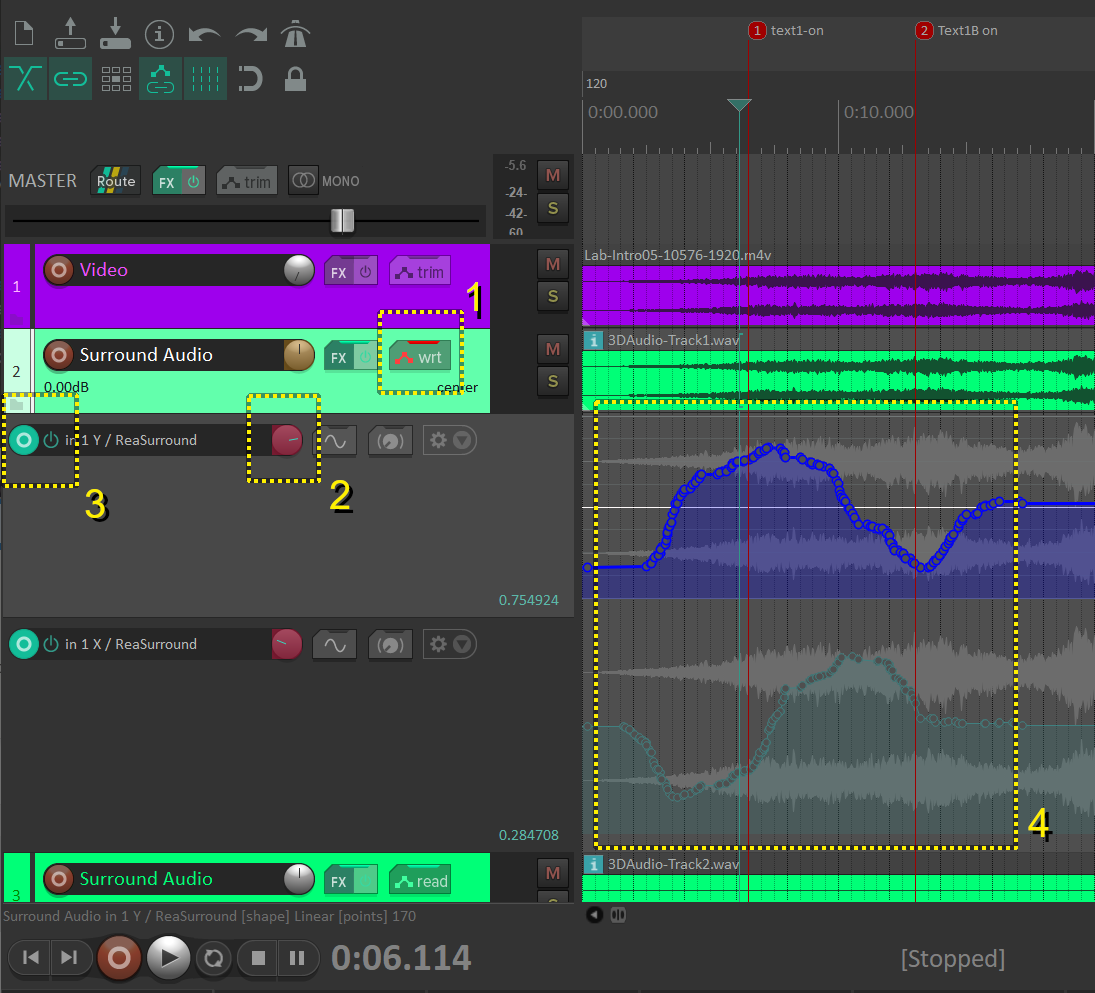

Animating each track's 'envelope' variables (in this instance the "in Y" and "in X" variables from the ReaSurround FX plugin) can be done in a number of ways.
- First the track needs to be switched to "wrt" (Write) mode This can be done either by clicking on the button (which may show 'trim' or 'read'), then making sure the "in Y" and "in X" are both "Armed" by clicking on the "Arm all visible" button for example, and the changing the "Automation mode" dropdown box to "Write"
- Alternatively, just right-click on the track's "in Y" or "in X" control knobs, and select "Write" (bottom of the pop-up list) Once this is done, the 'trim' button text will change to "wrt", and the control knobs will also turn red
- Clicking the 'Arm' buttons for each of the animated envelopes will toggle it from 'Armed' (shown in green) to disarmed (shown in grey). An envelope can only be animated when it is Armed (green)
- The envelope animation for each 'variable' is shown as a graph under each track sample in the timeline
- Press the track's "FX" button to bring up the ReaSurround plugin window again
With the envelopes Armed and set to Write mode, ANY changes made to the sample's position in the ReaSurround plugin window will overwrite the current values on the timeline. Hence you can 'animate' the value in realtime by pressing 'play' and altering the sample's position using the plugin window buttons, or moving the 'spot' directly, as the play head progresses.
NOTE: Return to Read mode It is important to remember to return a track's envelope mode back to "Read" once you have finished animating the values. If you do not do this, then the next time you hit 'play', the envelope will automatically be re-written with whatever value was last set in the ReaSurround plugin window!
To set the mode, again either click the 'trim' ("wrt") button, or right-click one of the red envelope control knobs, and then select "Read" from the list. The button should then show "read" (in green), and the control knobs also turn green
Rendering the Audio track
To export the audio track, select the section of the timeline of the audio you wish to export
eg: to export the entire populated audio timeline, Right-click in the top timeline area > "Set selection to items"
Select "File"(menu)> "Render..."
Select the required options in the "Render to File" dialog box, eg:
Disable "Tail" (so it doesn't add a blank end section)
Set 'Sample rate' to "48000", and set 'Channels' to "16"
Set 'Format' to "WAV", and 'WAV bit depth' to "16 bit PCM"
Disable "Multichannel tracks to multichannel files"
Then click the "Render 1 file" button to generate the audio file